Categories
Window Film and Tints

How Window Films Help Toronto Homes and Offices Use Less Energy Year-Round

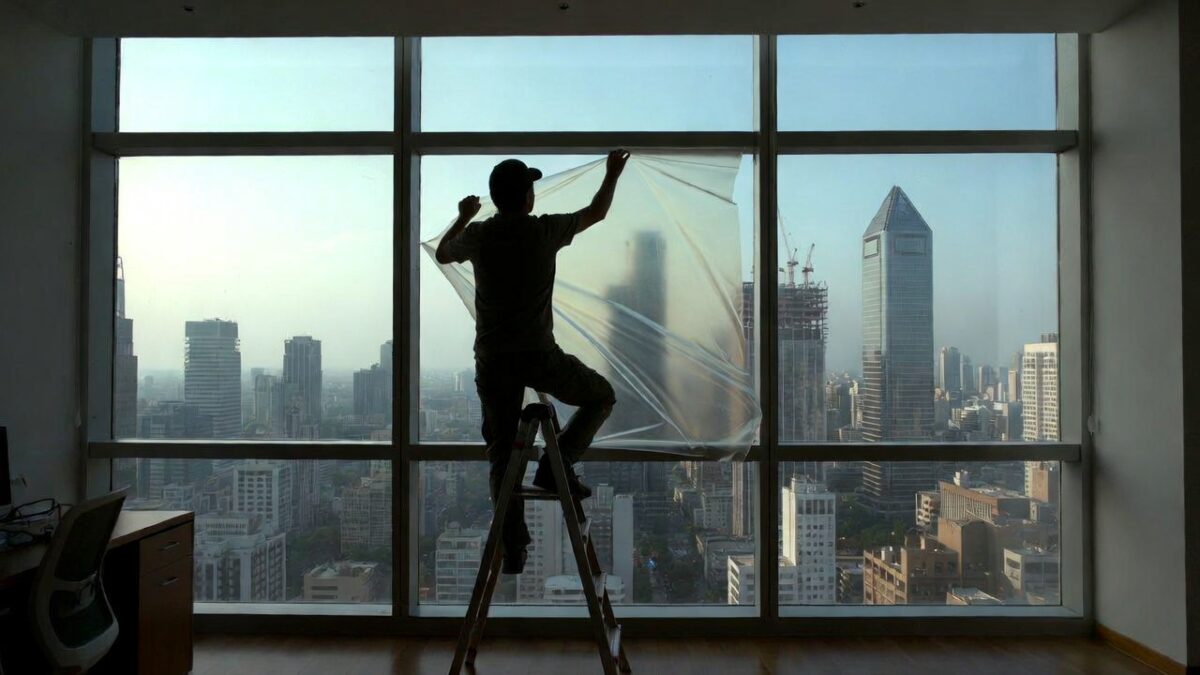
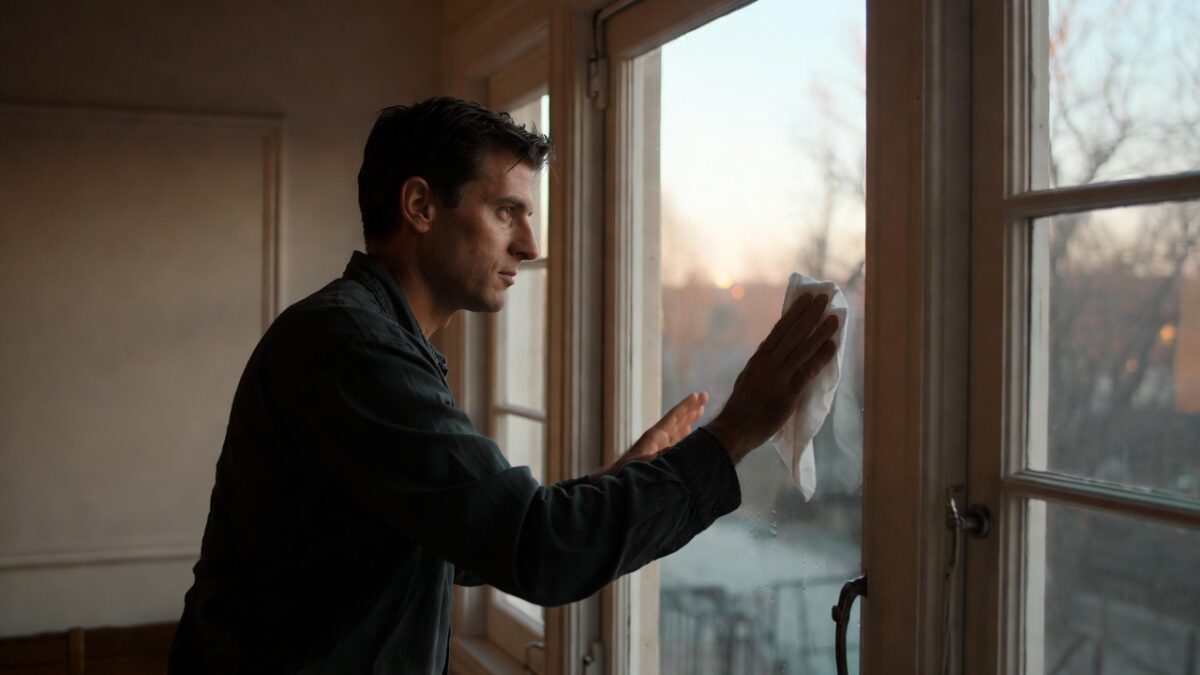
Window films are one of the most searched upgrades for energy savings in Toronto and the GTA. People search for window films when rooms feel too hot in summer, cold air creeps in during winter, and energy bills keep climbing. Many assume the problem is the furnace or air conditioner. In reality, the biggest issue is often the glass. Window films change how glass reacts to heat and sunlight, which helps buildings stay more comfortable using less energy.

Across Toronto, window films are used in condos, offices, medical clinics, retail shops, and older homes. They work without replacing windows or changing how a building looks. This article explains how window films improve energy efficiency, why they work so well in local buildings, and what people usually notice after installation.

How Window Films Change Heat Movement Through Glass

Glass lets heat pass through fast. Walls slow heat. Roofs slow heat. Windows do not.

During summer, sunlight enters through windows and turns into heat inside the room. During winter, warm indoor air escapes back through the same glass. Window films help slow both of these problems.

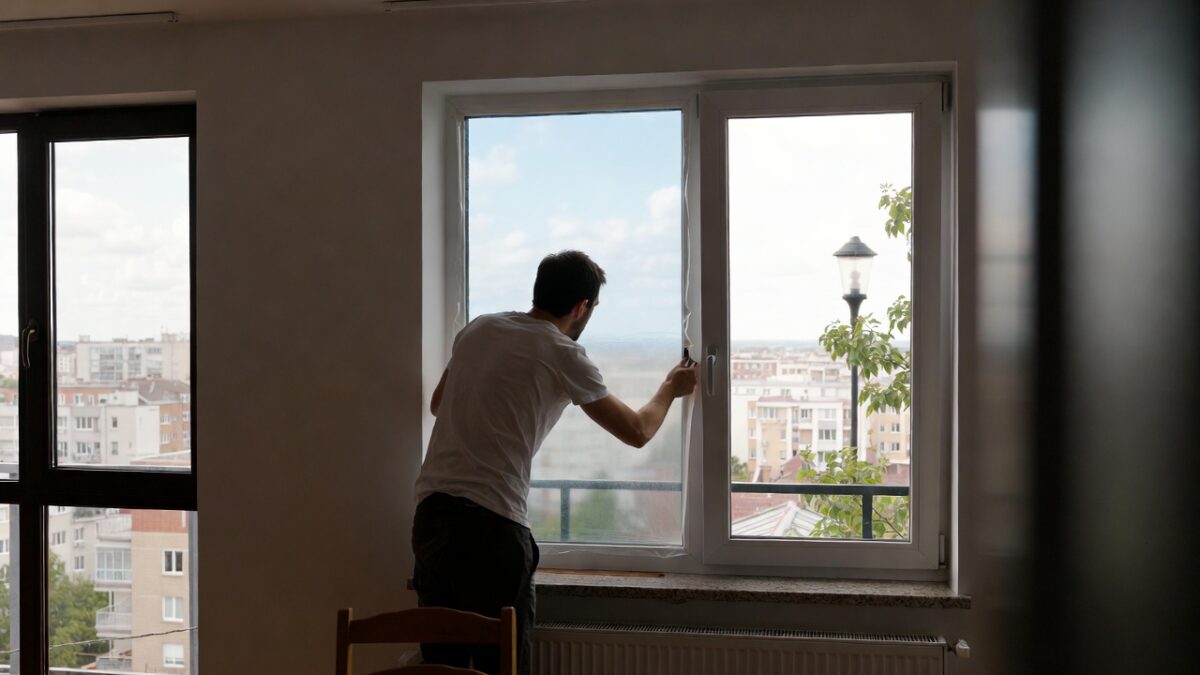
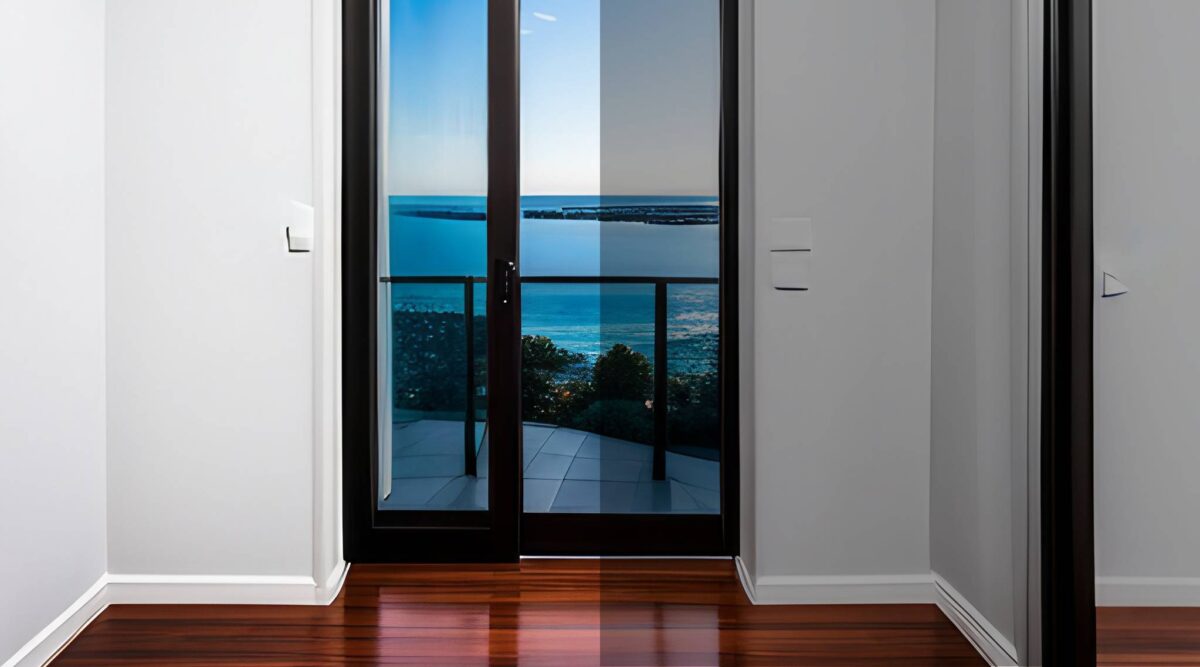
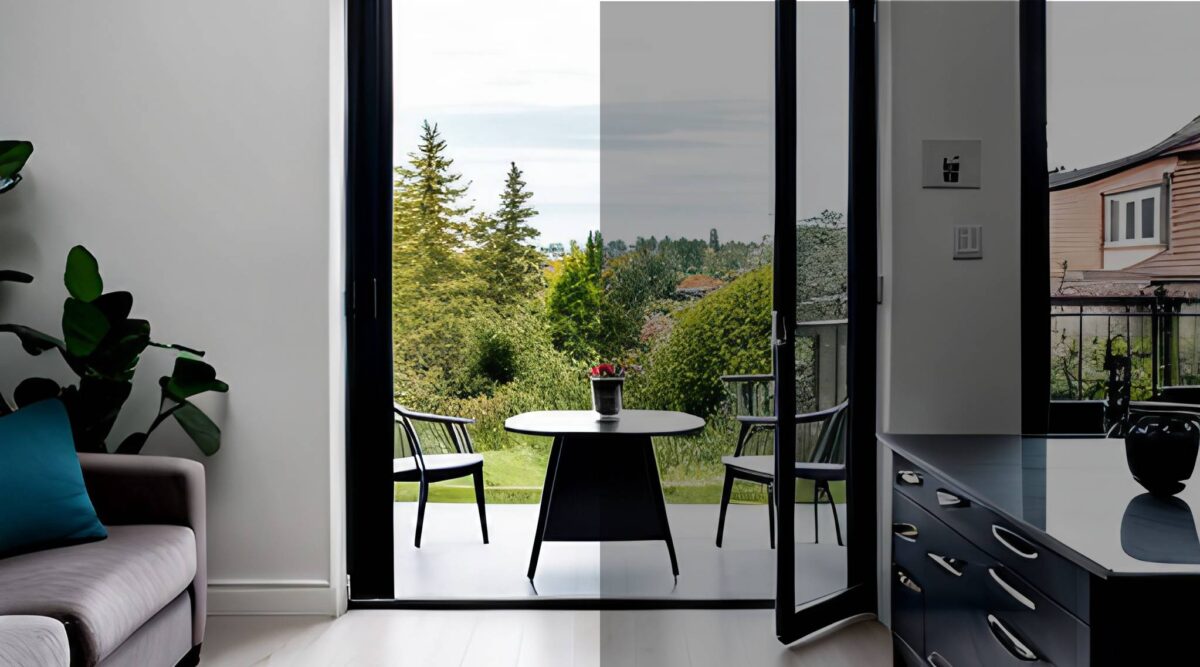
Energy-efficient window films are applied directly to existing glass. They reflect some solar heat away from the window. They absorb some heat before it enters the room. They also block UV rays that slowly warm furniture, floors, and air over time.

This is why window films are popular in downtown Toronto condos with floor-to-ceiling windows. Units facing south or west heat up quickly. Air conditioning runs longer than needed. Rooms feel uneven. After window films are installed, indoor temperatures feel steadier and AC systems cycle less.

For a clear explanation of heat-control options, this guide explains solar window films benefits and how they reduce heat without replacing windows.

Why Window Films Lower Energy Use in Toronto Buildings

Energy costs rise when heating and cooling systems work harder than they should. Window films help reduce that workload.

When less heat enters the building, air conditioners do not fight sunlight all day. When heat loss slows, furnaces do not need to replace warm air every hour.

Office buildings near Yonge Street often deal with uneven temperatures. One side of the floor feels warm. Another feels cold. Thermostats get adjusted all day. After window films are installed, temperature swings drop and HVAC systems stop overworking.

Retail spaces see similar results. A storefront near Scarborough Town Centre added window films after one summer of high cooling costs. The following summer, cooling hours dropped and staff stopped covering windows with posters.

Homes benefit as well. A detached home in Richmond Hill added window films to second-floor bedrooms. The owners noticed shorter AC cycles at night and steadier temperatures upstairs. No new equipment was installed.

For homeowners comparing costs, this article explains window film costs in a simple way.

Comfort Improvements Without Dark Rooms

A common concern is that window films make rooms dark. That idea comes from older tint styles. Modern window films work differently.

Most energy-focused window films block heat while allowing natural light to pass through. Visible light stays high. Infrared heat drops. Glare is reduced without making rooms feel closed in.

This matters in offices. Near King West, many offices rely on daylight. Without window films, glare forces blinds closed and lights stay on all day. Energy use goes up again.

With window films, blinds stay open longer. Daylight stays useful. Work areas near windows feel more comfortable.

Homes see the same benefit. Living rooms stay bright but cooler. Furniture fades slower too.

If shade levels are a concern, this guide explains window film and room darkness using simple examples.

Why Window Films Make Sense for Older and Newer Buildings

Many older Toronto buildings still use outdated glass. Single pane and early double pane windows are common. Full window replacement costs a lot and causes disruption.

Window films improve existing glass without removing anything.

This is why many homes near High Park and Roncesvalles start with window films. They reduce heat problems now without construction or permits.

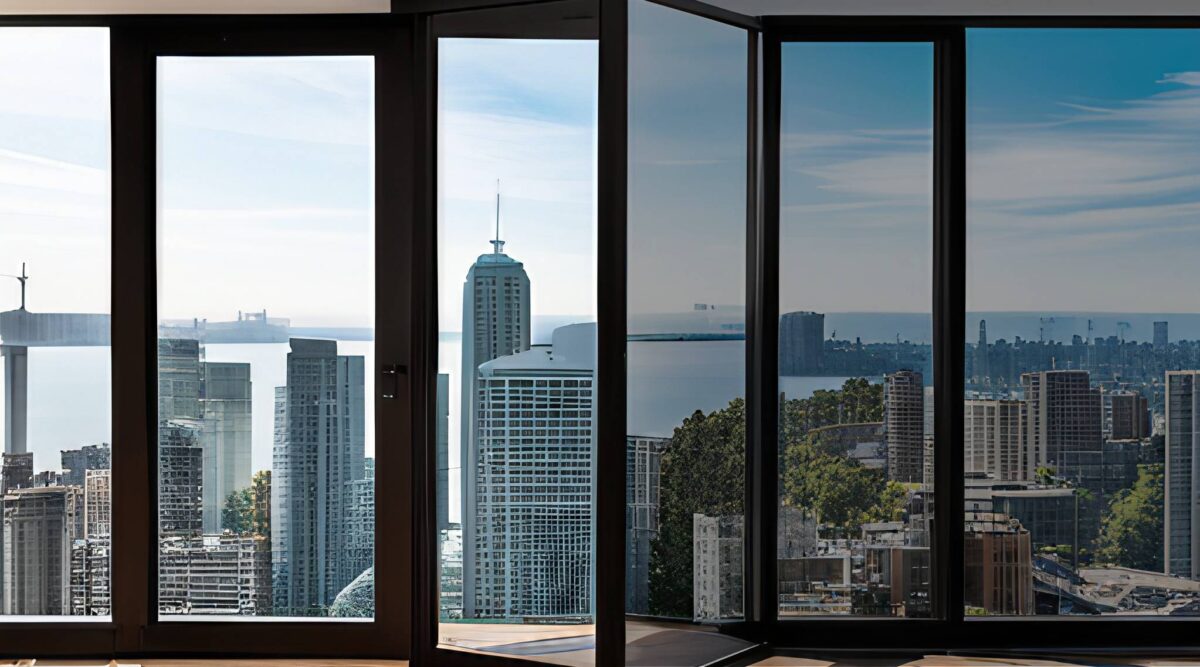
Newer buildings have a different issue. Too much glass. Modern condos and offices use large glass walls. Heat pours in during summer and escapes in winter.

Window films help balance these designs without changing how the building looks.

A newly built office near Vaughan Metropolitan Centre installed window films shortly after opening. The space looked great but felt hot in the afternoon. Film solved the comfort issue with no downtime.

Seasonal Energy Problems Window Films Help Solve in the GTA

Toronto summers bring heat waves and strong sun. South- and west-facing windows take the most heat.

Window films reduce solar heat gain during these months. Rooms cool faster and AC systems run less.

Toronto winters bring long cold stretches. Heat escapes through glass and drafts show up near windows.

Window films slow that heat loss. Rooms hold warmth longer and heating systems cycle less.

Natural Resources Canada explains how buildings lose energy in Canada here: https://natural-resources.canada.ca/energy-efficiency.

Case Study: Real Estate Office Near Yonge and Eglinton

A real estate office near Yonge and Eglinton had afternoon sun hitting workstations. Staff complained about heat and glare. Blinds stayed closed most of the day.

Window films were installed on west-facing glass only. Temperatures became steadier and blinds stayed open more often. Staff comfort improved within weeks.

Case Study: Townhouse in Oakville

A family in Oakville installed window films on front-facing windows. Summer afternoons felt heavy and AC ran late into the evening.

After installation, rooms cooled faster and AC shut off earlier. The home felt more stable during heat waves.

Why Businesses Choose Window Films Before Bigger Upgrades

Business owners often compare upgrades. New HVAC systems. New windows. Window films.

Window films install quickly. No shutdowns. No permits. Lower upfront cost.

They also work well with privacy or security films, so one install can solve more than one issue.

The U.S. Department of Energy explains how windows affect heat flow in buildings here: https://www.energy.gov/eere/buildings/articles/windows-and-energy-efficiency.

How Long Window Films Continue to Work

Quality window films last many years. They do not need power. They do not need controls.

Once installed, they manage heat every day.

This long lifespan makes window films a steady energy upgrade for homes and offices.

Why Local Experience Matters With Window Films

Glass types vary across the GTA. Condo glass differs from house glass. Office glass is different again.

Film selection matters. Installation quality matters.

Local installers understand how Toronto buildings react in summer and winter. That affects results.

Final Thoughts on Window Films and Energy Efficiency

Window films are not a trend. They fix heat gain and heat loss through glass.

For Toronto homes and offices, window films reduce energy waste and improve comfort without major changes.

If rooms feel hot in summer and cold in winter, glass is often the reason.

Window films fix that problem.

If you want to learn more about energy-efficient window films or see if they fit your space, visit https://tintly.ca/ and start with a simple conversation.

Categories
Window Film and Tints

How to Peel Off Window Film Without Damaging Glass

Removing window film can seem like a daunting task, especially if you’re worried about damaging your glass. But with the right techniques and tools, you can remove window film efficiently and safely. Whether you’re dealing with car window tint or home window film, this guide will walk you through the process step-by-step.

Before diving into the removal process, it’s helpful to understand what window film is and why it can be tricky to remove. Window film is a thin laminate film that can be installed on glass surfaces. It serves various purposes, such as reducing glare, improving privacy, and even enhancing energy efficiency by blocking UV rays.

Over time, however, window film can degrade, bubble, or simply become outdated in style. When this happens, removing it becomes necessary.

Close-up of window film on glass

Tools You Will Need

For a smooth window film removal process, gather the following tools:

  • Razor blades or a utility knife
  • Spray bottle filled with soapy water
  • Hairdryer or heat gun
  • Scraper or plastic card
  • Microfiber cloth
  • Adhesive remover or vinegar solution

Step-by-Step Guide to Removing Window Film

Step 1: Soften the Adhesive

The first step in removing window film is to soften the adhesive. This makes it easier to peel off the film without leaving residue or damaging the glass beneath.

Using Heat

A hairdryer or heat gun can effectively soften the adhesive. Hold the dryer or gun a few inches away from the film, moving it slowly back and forth. The heat will loosen the adhesive, making the film easier to peel.

Using a hairdryer on window film

Using Soapy Water

If you prefer a chemical-free method, fill a spray bottle with soapy water and generously spray the film. Allow it to soak for at least 10-15 minutes. The water will penetrate the adhesive, softening it for easier removal.

Step 2: Start Peeling the Film

Once the adhesive is softened, you can begin peeling the film. Start at a corner of the window and gently use a razor blade or utility knife to lift the edge of the film. Be careful not to scratch the glass.

Peeling Technique

Grab the lifted edge with your fingers and slowly peel the film away from the glass. Use steady, even pressure to avoid tearing the film. If the film resists, apply more heat or soapy water to the area to further soften the adhesive.

Step 3: Remove Residual Adhesive

After the film is removed, some adhesive may remain on the glass. This needs to be cleaned off to ensure a clear, streak-free finish.

Adhesive Remover

Apply a commercial adhesive remover or a homemade vinegar solution to the adhesive residue. Let it sit for a few minutes to dissolve the adhesive.

Scraping Off Residue

Use a scraper or plastic card to gently scrape away the softened adhesive. Wipe the glass with a microfiber cloth to remove any remaining residue.

Scraping adhesive off glass

by Eduardo Freitas (https://unsplash.com/@edufret)

Step 4: Clean the Glass

Finally, clean the glass thoroughly with a glass cleaner or a vinegar-water solution. This will remove any last traces of adhesive and leave your glass sparkling clean.

Tips for Success

  • Patience is Key: Rushing the process can lead to scratches or damage. Take your time to ensure a clean removal.
  • Test Adhesive Removers: Before applying any chemical solution, test it on a small, inconspicuous area to ensure it doesn’t damage the glass or surrounding materials.
  • Use New Blades: A dull blade can scratch the glass. Ensure your razor blades or utility knives are sharp for best results.

When to Consider Professional Help

While removing window film yourself is entirely doable, there are situations where professional help might be the better option:

  • Large Windows: Handling a large surface can be challenging and may require more hands.
  • Stubborn Film: If the film is particularly old or stubborn, professionals have specialized tools and solutions to handle tough adhesive.
  • High Windows: For windows that are hard to reach, safety is a concern, and professionals can access them safely with ladders or scaffolding.

Conclusion

Window film removal doesn’t have to be a hassle. With the right tools and techniques, you can remove film from your windows without damaging the glass. Whether you’re updating your home’s look, replacing old film, or preparing for a new installation, following these steps will ensure a smooth and successful process.

Remember, if the task feels too daunting or if you’re dealing with particularly challenging situations, don’t hesitate to reach out to a professional for assistance. Happy peeling!“`

Categories
Window Film and Tints

Window Films for Toronto Properties: A Practical Look at Privacy, Comfort, and Everyday Use

Window films are one of the most searched window upgrades in Toronto and the GTA. People search for window films when privacy feels weak, glare makes screens hard to see, or rooms feel too hot in summer and too cold in winter.

Most searches for window films come from frustration. A condo window faces another tower. A shop feels exposed at night. An office gets blasted by sun every afternoon. Window films are used across Toronto to fix these problems without replacing the glass.

This guide explains window films in clear, simple language. It is written for homeowners, condo residents, and business owners who want real answers, not sales talk.

By the end of this guide, you will understand:

  • What window films are and how they work
  • The difference between decorative, privacy, and office window films
  • When window films work better than blinds or curtains
  • Common mistakes seen in Toronto homes and offices
  • How to choose window films that solve real problems

What Window Films Are and Why They’re Used in Toronto

Window films are thin layers installed directly on glass. A professional window tinting service installs the film on the inside of the window in most Toronto buildings.

People choose window films because window replacement is expensive and slow. In many condos, replacing windows is not allowed. Window films work with the glass already in place.

Across Toronto and the GTA, window films are used to:

  • Add privacy without blocking daylight
  • Reduce glare on TVs and computer screens
  • Block UV rays that fade floors and furniture
  • Make rooms feel more comfortable near windows
  • Change the look of clear glass

In winter, rooms near large windows feel cold even when heat is on. In summer, west and south facing windows trap heat by mid afternoon. Window films help reduce both issues.

If you are new to the topic, this overview explains the basics in plain terms: introduction to window films.

Decorative Window Films That Balance Light and Privacy

Decorative window films change how glass looks while still letting light pass through. Many people think decorative window films are only for style. In real homes, they are often chosen for privacy.

Decorative window films include frosted finishes, soft textures, lines, and etched glass looks.

In Toronto homes, decorative window films are commonly used in:

  • Bathrooms facing nearby houses
  • Front doors with clear glass inserts
  • Stairwells with exposed windows
  • Condos with shared balconies

New local example from High Park. A renovated semi had a tall stair window facing the neighbour’s yard. Curtains blocked daylight and collected dust. A frosted decorative window film fixed privacy and kept the space bright.

Decorative window films are also popular in clinics, salons, and small offices. They add separation without closing the room.

For common styles and real uses, this article shows helpful examples: decorative window film ideas.

A frequent mistake is choosing a decorative pattern without checking night privacy. Some films blur views during the day but show shadows when lights are on inside.

Privacy Window Films and the Day vs Night Issue

Privacy window films are often misunderstood. Many Toronto buyers assume all privacy films work the same way.

There are two main types.

Daytime privacy window films use a reflective surface. They block views during daylight hours. At night, the effect reverses when interior lights are on.

Full privacy window films include frosted, matte, and blackout films. Privacy stays the same day and night.

Downtown condos often choose reflective films to keep views while blocking nearby buildings during the day. Ground-floor homes usually need full privacy window films.

New example from North York. A ground-level office faced a parking lot. Reflective film worked during the day but failed after sunset. Switching to frosted privacy film solved the issue in one visit.

If privacy is the main goal, this guide explains options clearly: privacy window films explained.

Office Window Films for Glare, Heat, and Focus

Office window films help reduce glare, control heat, and add privacy in work spaces. Large glass walls look modern but cause daily problems.

Office window films are commonly used to:

  • Reduce screen glare
  • Add meeting room privacy
  • Control heat near windows
  • Improve staff comfort
  • Add light branding to glass

In Markham and Vaughan offices, west-facing glass causes glare by mid afternoon. Staff move desks or close blinds. Office window films fix glare without darkening the room.

Many Toronto offices are leased. Window films can be removed later, which helps when tenants or layouts change.

This short video explains glare control in simple terms: how window films reduce glare.

Window Films vs Blinds and Curtains in Toronto Buildings

Blinds and curtains still work in some homes. In condos and offices, they often cause problems.

Window films don’t collect dust. They don’t block floor space. They work well in small rooms.

In Toronto condos, blinds sometimes clash with building rules or window shapes. Window films are installed inside and are usually allowed.

If you are choosing between film and replacing windows, this comparison helps explain the difference: window films vs window replacements.

Common Window Film Mistakes Seen in Toronto

Most problems happen when people choose window films without a clear goal.

  • Using reflective film for night privacy
  • Picking dark film instead of glare control
  • Ignoring condo or office rules
  • Using DIY film on large glass panels

Poor installation causes bubbles, peeling edges, and dust under the film. This shortens film life fast.

How to Choose the Right Window Films for Your Space

Start with the problem.

  • Too much glare means glare control film
  • Feeling exposed means privacy film
  • Heat buildup means solar window film
  • Plain glass means decorative film

Toronto buildings use many glass types. What works in a detached home may not work in a condo tower.

Natural Resources Canada explains how windows affect comfort and energy use here: NRCan window buyer guide.

Why Local Experience Matters With Window Films

Toronto weather, glass coatings, and building rules affect how window films perform.

Condos downtown often use coated glass. Older homes in East York use plain glass. Offices in Mississauga use large curtain wall systems.

Local installers understand these differences. This avoids wasted time and poor installs.

Final Thoughts and Next Steps

Window films fix real problems in Toronto homes and offices. Privacy improves. Glare drops. Rooms feel better near windows.

If you’re unsure, start with one window. Test the film. Live with it for a few days.

If you want clear advice and professional installation, visit Tintly Window Films to see how window films can work for your home or business.

Categories
Window Film and Tints

Removing Window Film Is It a DIY Job

# Removing Window Film: Is It a DIY Job?

Window films have become a popular solution for enhancing privacy, reducing glare, and improving energy efficiency in homes and cars. However, there comes a time when you may need to remove the window film. Whether it’s due to wear and tear, a change in style, or simply wanting to upgrade to a newer film, the question arises: Is removing window film a DIY job?

In this article, we’ll delve into the intricacies of window film removal, exploring the steps involved, the tools required, and whether tackling this project on your own is advisable. We’ll also provide insights into when it might be best to seek professional help.

Window film application process

Before we dive into the removal process, it’s important to understand what window film is and why it’s used. Window film is a thin laminate film that can be installed on the interior or exterior of glass surfaces in homes and vehicles. It serves multiple purposes:

  • Privacy Enhancement: Tinted films can obscure the view from outside, offering privacy without sacrificing natural light.
  • UV Protection: Films can block harmful ultraviolet rays, protecting interiors from fading and reducing the risk of skin damage.
  • Energy Efficiency: By reducing solar heat gain, window films help maintain a comfortable indoor temperature, potentially lowering energy bills.
  • Glare Reduction: Films can minimize glare on screens, making it easier to view digital devices and televisions.

Reasons for Removing Window Film

Old window film peeling

There are several reasons why you might consider removing window film:

  • Aesthetic Changes: You may want to update the look of your windows with a new design or tint.
  • Film Deterioration: Over time, films can become discolored, bubble, or peel, necessitating removal.
  • Property Sale: New owners might prefer a different style or no film at all.
  • Legal Requirements: In some regions, regulations around vehicle window tinting may require removal or adjustment.

The DIY Window Film Removal Process

Removing window film might seem daunting, but with the right tools and a bit of patience, it can be accomplished as a DIY project. Here’s a step-by-step guide:

Gather Your Tools

To begin, you’ll need the following tools:

  • A utility knife or razor blade
  • A spray bottle filled with soapy water
  • A hairdryer or heat gun
  • A squeegee or scraper
  • Microfiber cloths

Step 1: Soften the Adhesive

Start by using a hairdryer or heat gun to warm the window film. This helps soften the adhesive, making the film easier to peel off. Hold the hairdryer a few inches away from the glass, moving it slowly across the surface.

Step 2: Peel the Film

Using your utility knife, carefully lift a corner of the film. Once you have a grip, slowly peel the film away from the glass. If it resists, apply more heat to soften the adhesive further.

Step 3: Remove Residual Adhesive

After removing the film, there may be adhesive residue left on the glass. Spray the soapy water onto the affected area and use the squeegee or scraper to gently remove the residue. Wipe the glass clean with a microfiber cloth.

Step 4: Clean the Glass

Finally, clean the glass thoroughly with a glass cleaner to ensure it’s free of any remaining adhesive or streaks.

Challenges You Might Encounter

While removing window film can be a straightforward process, there are potential challenges:

  • Stubborn Adhesive: Some adhesives can be particularly tenacious, requiring extra effort and patience to remove.
  • Scratches: Using a razor blade on glass carries the risk of scratching if not done carefully.
  • Time-Consuming: Depending on the size and number of windows, the process can be time-consuming.

When to Call in the Professionals

Professional window film removal

by Maryam F. (https://unsplash.com/@encoreunemaryam)

While DIY removal is possible, there are situations where it might be best to consult a professional:

  • Large or High Windows: For windows that are difficult to reach or particularly large, a professional can ensure safe and efficient removal.
  • Expensive Vehicles: On high-end vehicles, preserving the integrity of the glass and surrounding surfaces might warrant professional services.
  • Lack of Time or Tools: If you’re short on time or don’t have the necessary tools, hiring a professional can be a worthwhile investment.

Conclusion: Is It Worth Doing It Yourself?

Removing window film can certainly be a DIY task if you’re equipped with the right tools and a bit of patience. However, weighing the challenges and potential for damage against the cost and convenience of professional services is crucial. For those who prefer a hassle-free experience, or when dealing with complex situations, professional removal might be the best option.

Ultimately, whether you choose to tackle it yourself or call in the experts, understanding the process and the purpose of window film will help you make an informed decision. By doing so, you can ensure that your windows remain a functional and stylish element of your home or vehicle.

Categories
Window Film and Tints

Residential vs Commercial Window Films: A Practical Guide for Toronto Homes and Businesses

Window films are one of the most searched window upgrades in Toronto and the GTA. People search for window films because rooms feel too hot in summer, glare makes work hard, privacy feels weak, or energy bills keep creeping up. Business owners search for window films to protect staff, reduce sun exposure, and control large glass areas. Homeowners search because one room feels useless half the year.

The keyword “window films” spikes every summer during heat waves and again in winter when cold glass makes rooms feel drafty. This is not a trend. It is a real need tied to how buildings behave in this climate.

Then people hit a wall.

Residential window films. Commercial window films.

The names sound close. The purpose is very different.

Both are window films. Both stick to glass. Both help with heat, glare, and UV. But they are made for different spaces, different glass types, and different daily use. Picking the wrong one often leads to poor results or regret later.

This guide explains window films in clear language, using real examples from Toronto condos, older homes, retail stores, and offices across the GTA.

Why Window Films Are in Demand Across Toronto

People usually do not search for window films unless something feels off.

Condos near the lake overheat before noon. Homes in East York feel cold near big windows in January. Offices downtown deal with screen glare every afternoon. Retail shops worry about broken glass after dark.

Window films help fix many of these issues without replacing windows or opening walls.

The trouble starts when all window films get treated like the same product.

Residential Window Films Explained in Plain Words

Residential window films are made for places where people live. Houses. Condos. Townhomes. Basement units. Bedrooms. Living rooms. Kitchens.

Across the GTA, residential window films show up in south-facing condos downtown, semi-detached homes in North York, townhomes in Vaughan, and older houses with large street-facing windows.

Homeowners usually reach out after these problems show up:

  • One room feels much hotter than the rest
  • Glare hits the TV or laptop every afternoon
  • Neighbours can see straight inside at night
  • Furniture and floors start to fade
  • Heating and cooling bills feel higher every year

Residential window films help with these problems while keeping the home looking normal.

Many people start by learning the basics of window films so they know what film can and cannot do.

What Residential Window Films Are Made to Do

Residential window films focus on comfort and appearance.

  • They reduce heat before it enters the glass
  • They cut glare without killing daylight
  • They block UV rays that cause fading
  • They improve daytime privacy
  • They help rooms feel more even year round

Most residential window films are thinner than commercial films. This matters because home glass reacts more to fast temperature changes, especially during Toronto winters.

How Residential Window Films Look Inside a Home

Most homeowners want light, not dark rooms.

Residential window films are designed to stay subtle.

  • Clear or near-clear heat control films
  • Light neutral tints
  • Frosted films for bathrooms and entry doors
  • Soft reflective films for daytime privacy

Reflective films lose privacy at night once lights turn on. Frosted films block views all day. This detail confuses many people.

New Example: Semi-Detached Home in Leslieville

A homeowner in Leslieville had a front room that overheated every afternoon. Curtains helped, but the room felt dark and closed.

A residential window film was installed with strong heat rejection but low tint. The room cooled down. Daylight stayed. The street look did not change.

This is a common use of window films in older Toronto homes.

Installing Residential Window Films in the GTA

Toronto homes use many types of glass. Single-pane windows. Double-pane units. Triple-pane condo glass. Bay windows. Sliding doors.

A proper installer checks:

  • Glass type
  • Window age
  • Seal condition
  • Sun direction

The wrong window film on the wrong glass can cause stress cracks. This risk rises during winter cold snaps. That is why residential window films should be installed by teams familiar with GTA housing.

Many homeowners also compare film to replacement. This breakdown of window films versus window replacements explains why film often comes first.

Commercial Window Films for Offices and Public Buildings

Commercial window films are made for offices, retail stores, clinics, schools, and condo common areas.

In Toronto and the GTA, commercial window films are used in downtown office towers, street-level shops, medical buildings, and plazas.

The problems here affect more people and larger glass areas.

What Commercial Window Films Are Built For

Commercial window films focus on durability and performance.

  • They control heat across large glass surfaces
  • They reduce glare on office screens
  • They improve comfort for staff and visitors
  • They add privacy to clinics and offices
  • They support safety and security needs

Many commercial window films are thicker than residential films. Some include layers that help hold broken glass together after impact.

Office Comfort and Daily Work

This problem shows up in almost every office.

Desks near windows feel hot. Desks farther away feel cold. People move monitors and chairs all day.

Commercial window films reduce solar heat gain across the space. This helps balance temperatures and cut glare without touching HVAC systems.

New Example: Small Tech Office in Liberty Village

A tech office in Liberty Village dealt with heavy glare during late afternoons. Staff blocked windows with paper and boxes.

Commercial window film was installed on west-facing glass. Glare dropped fast. Natural light stayed. Complaints stopped.

The office felt calmer and easier to work in.

Retail and Glass Safety in Toronto

Retail shops across Toronto face smash-and-grab risks. Glass breaks fast.

Some commercial window films include safety layers that slow entry and keep glass together.

This guide on security window films explains how that works in simple terms.

Installing Commercial Window Films

Commercial installs take planning.

  • Large glass areas
  • Lifts or scaffolding
  • After-hours work
  • Building approvals

Poor installs peel, bubble, or fail inspection. Experience matters.

Residential Window Films vs Commercial Window Films

Residential window films focus on comfort, privacy, and appearance in living spaces.

Commercial window films focus on performance, durability, and safety in work spaces.

Both are window films. They solve different problems.

Window Films, Heat, and UV Exposure

Toronto summers bring strong sun through south and west windows. Winters bring cold glass and drafts. UV exposure happens all year.

Window films help manage heat and UV when the correct film is used.

Natural Resources Canada explains how windows affect heat loss and gain here: Upgrading windows and exterior doors.

The Skin Cancer Foundation also explains UV through glass here: UV exposure through windows.

Cost Questions People Ask About Window Films

Many people ask if window films cost less than replacing windows. In most cases, yes.

Window films install faster, cost less, and avoid construction mess. They do not fix rotten frames. They help with comfort, glare, privacy, and fading.

Why Local Experience Matters

Toronto buildings vary a lot. Old homes. New towers. Heritage rules. Condo boards.

Installers with local experience know which window films perform well in GTA weather and which products last.

Final Thoughts for Property Owners

Window films are not one-size-fits-all.

Residential window films and commercial window films both work when used in the right place. Choosing the wrong type causes problems later.

If you want clear advice from a local team that installs window films across Toronto and the GTA, visit Tintly Window Films and get straight answers before deciding.

Categories
Window Film and Tints

Best Practices for Cleaning Tinted Windows Safely

Close-up of tinted window

Before diving into cleaning tips, it’s important to understand what tinted windows are. Tinted windows have a thin film applied to them that can reduce the amount of sunlight and heat that enters your home. This film is delicate and can be easily damaged if not handled properly. Therefore, it’s crucial to use the right cleaning methods to preserve its integrity.

Tint films come in various types, each with different levels of darkness and reflective properties. Some films are designed to block UV rays, while others focus on improving privacy. Regardless of the type, all tinted films are susceptible to damage from improper cleaning techniques. Knowing the specifics of your window tint can also help in selecting the most suitable cleaning products and methods to use.

Essential Tools for Cleaning Tinted Windows

To clean your tinted windows without causing any damage, you’ll need the following tools:

  • A soft microfiber cloth
  • A gentle window cleaner or a DIY solution (more on this below)
  • A squeegee with a soft rubber edge
  • A spray bottle

Using the right tools ensures that you don’t scratch or damage the tint film during cleaning. Avoid using abrasive materials such as paper towels or rough sponges that can leave marks on the film. Microfiber cloths are particularly effective because they trap dirt and dust without being harsh on the delicate surface of the tint film.

The squeegee, especially one with a soft rubber edge, is essential for removing excess cleaning solution without leaving streaks. A spray bottle allows for even distribution of the cleaning solution, ensuring that no area is oversaturated. By investing in these tools, you’re taking the first step in protecting your windows while keeping them clean and clear.

Step-by-Step Guide to Cleaning Tinted Windows

Step 1: Prepare Your Cleaning Solution

DIY cleaning solution for windows

You can opt for a commercial window cleaner labeled safe for tinted windows or make a DIY solution. To make your own, mix equal parts of distilled water and white vinegar in a spray bottle. This natural solution is effective and safe for tinted films. Additionally, you can add a few drops of mild dish soap if extra cleaning power is needed.

It’s important to avoid using harsh chemicals in your cleaning solution, as they can deteriorate the tint film over time. Always test the solution on a small, inconspicuous area of the window to ensure it doesn’t cause any damage. By taking these precautions, you can clean your windows effectively without compromising the integrity of the tint.

Step 2: Dust the Windows

Begin by gently dusting the windows with a dry microfiber cloth. This step helps remove any loose dirt or debris that could scratch the tint if left during the cleaning process. Dusting also ensures that the cleaning solution can work more effectively, as it won’t be obstructed by surface dirt.

For hard-to-reach areas, consider using a microfiber duster with an extendable handle. This tool can help you clean high windows or tight corners without putting undue stress on the tint film. Regular dusting not only keeps your windows looking clean but also prolongs the life of the tint by minimizing surface abrasions.

Step 3: Spray the Cleaning Solution

Lightly spray the cleaning solution onto the window. Be careful not to saturate the window, as excess liquid can seep into the edges of the tint film and cause it to peel. The goal is to apply just enough solution to dissolve and lift away grime without soaking the tint.

When spraying, maintain a consistent distance from the window to ensure even coverage. If you’re cleaning a larger window, it may be helpful to work in sections to avoid the solution drying before you can wipe it away. This methodical approach will help you achieve a streak-free finish without risking damage to the tint.

Step 4: Wipe with a Microfiber Cloth

Using a clean microfiber cloth, gently wipe the window in a vertical or horizontal motion. Avoid using circular motions as they can leave streaks. The microfiber cloth will effectively clean the surface without scratching the tint, leaving your windows clear and shiny.

If you’re dealing with stubborn spots, apply a bit more pressure with the microfiber cloth, but always be gentle to avoid damaging the film. Keep a few spare cloths on hand to swap out as they become saturated with cleaning solution, ensuring you don’t transfer dirt back onto the window.

Step 5: Use a Squeegee for a Streak-Free Finish

For larger windows, a squeegee can be very helpful. Start at the top of the window and pull the squeegee down in a straight line. Wipe the squeegee blade with a clean cloth after each pass to avoid transferring dirt back onto the window. This technique will ensure that your windows dry without streaks, maintaining their pristine appearance.

Using a squeegee not only makes the cleaning process more efficient but also minimizes the risk of over-wetting the tint film. If you’re new to using a squeegee, practice on a smaller section first to get a feel for the right pressure and angle to use. Over time, you’ll develop a technique that works best for your specific windows.

Step 6: Dry the Edges

After cleaning, use a dry microfiber cloth to gently dry the edges of the window. This step ensures that no liquid remains trapped around the tint film, which could lead to peeling over time. Pay special attention to corners and seams, as these areas are most vulnerable to moisture damage.

By thoroughly drying the edges, you prevent the growth of mold or mildew, which can occur if moisture is left to sit. This final step not only protects the tint film but also contributes to the overall longevity and appearance of your windows.

Tips for Maintaining Tinted Windows

  • Avoid Ammonia-Based Cleaners: Ammonia can damage the tint film, causing it to discolor or become brittle over time. Always check the label of commercial cleaners to ensure they are ammonia-free.
  • Regular Cleaning Schedule: To keep your tinted windows looking their best, establish a regular cleaning schedule. Cleaning them every few months will help maintain their clarity and effectiveness. Consistent maintenance prevents the build-up of dirt and grime, which can be more challenging to remove if left unattended.
  • Gentle Pressure: When cleaning, use gentle pressure to avoid stressing the tint film. Excessive force can lead to scratches or bubbles. By being mindful of the pressure you apply, you ensure that the film remains intact and that the windows maintain their visual appeal.
  • Inspect for Damage Regularly: Regularly check your tinted windows for any signs of damage, such as bubbling or peeling. Early detection allows for prompt repairs, preventing minor issues from becoming major problems.

Common Mistakes to Avoid

Avoid using harsh chemicals on tinted windows

by Igor Tverdovskiy (https://unsplash.com/@tvigor)

  • Using Abrasive Tools: As mentioned earlier, avoid abrasive materials like scouring pads or rough sponges. These can scratch and damage the tint. Even seemingly harmless tools like paper towels can leave micro-scratches that accumulate over time.
  • Neglecting Edge Care: Pay special attention to the edges of the tint film. Ensure they are dry after cleaning to prevent peeling. Water trapped in these areas can weaken the adhesive, leading to premature failure of the film.
  • Ignoring Small Damages: If you notice any small bubbles or scratches in the tint film, address them promptly. Ignoring these issues can lead to larger problems down the line. Small damages can often be repaired without the need for replacing the entire film, saving you time and money.
  • Skipping Protective Measures: Consider adding a protective layer or film to your tinted windows if they’re in high-traffic areas. This additional protection can help safeguard against accidental scratches or damage.

Conclusion

Cleaning tinted windows may require a bit more care than regular glass, but the effort is worth it to maintain their beauty and functionality. By following these best practices and using the right tools, you can ensure your tinted windows remain in top condition, providing you with privacy, energy efficiency, and enhanced aesthetics for years to come.

Whether you’re an interior designer looking to maintain the pristine condition of your client’s windows or a homeowner wanting to protect your investment, these tips will help you achieve your goal. Remember, the key is gentle care and using the right materials to keep your tinted windows spotless and scratch-free. With regular maintenance and attention to detail, your tinted windows will continue to serve as a valuable asset to your home or office environment.